Monday, December 22, 2014

8' Toy chest

Here is a project from a while ago that I forgot to post. I teamed up with a friend to build this toy chest for his young son. The idea was to get toys off the floor with this giant, easy to build project. Some people wouldn't call this woodworking, and that's fine, but this is the style of  building that suits the purpose. It is going to take some abuse, and probably be relatively temporary. This will be easy to repair, disassemble, or hand down to someone else after the kid(s) age a bit.

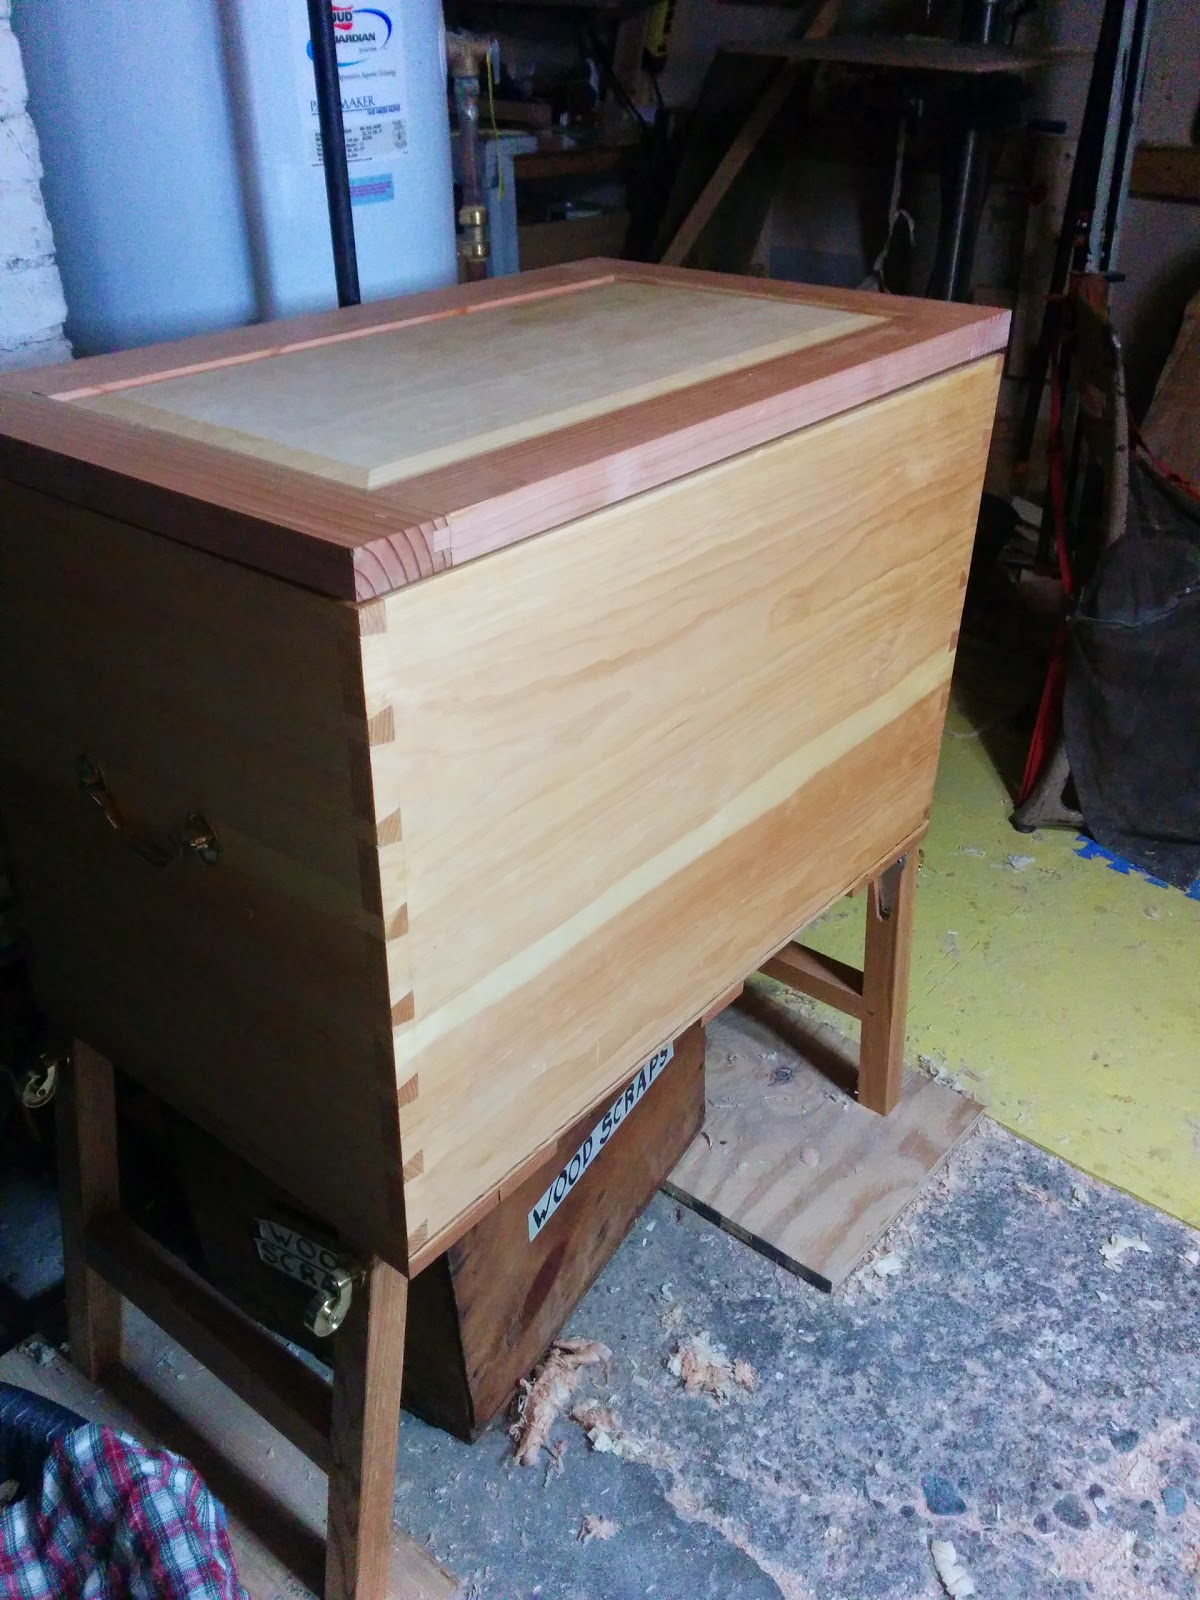
Toy chest, mid build. The lid breaks into 3', 2', and 3' sections.

The chest is 8' long, the same length as full sized sheets of plywood, and the 2"x4" lumber we bought. The two 4'x8' sheets of plywood were cut down the middle lengthwise. Two 2"x4"x8' boards were screwed to each one, running down each side. These form the front and back .After that, we screwed the ends and bottoms in, using short lengths of 2x4's to complete the frame. All the plywood dimensions are in 1' increments, and the 2"x4"s are measured to fit in the spaces.

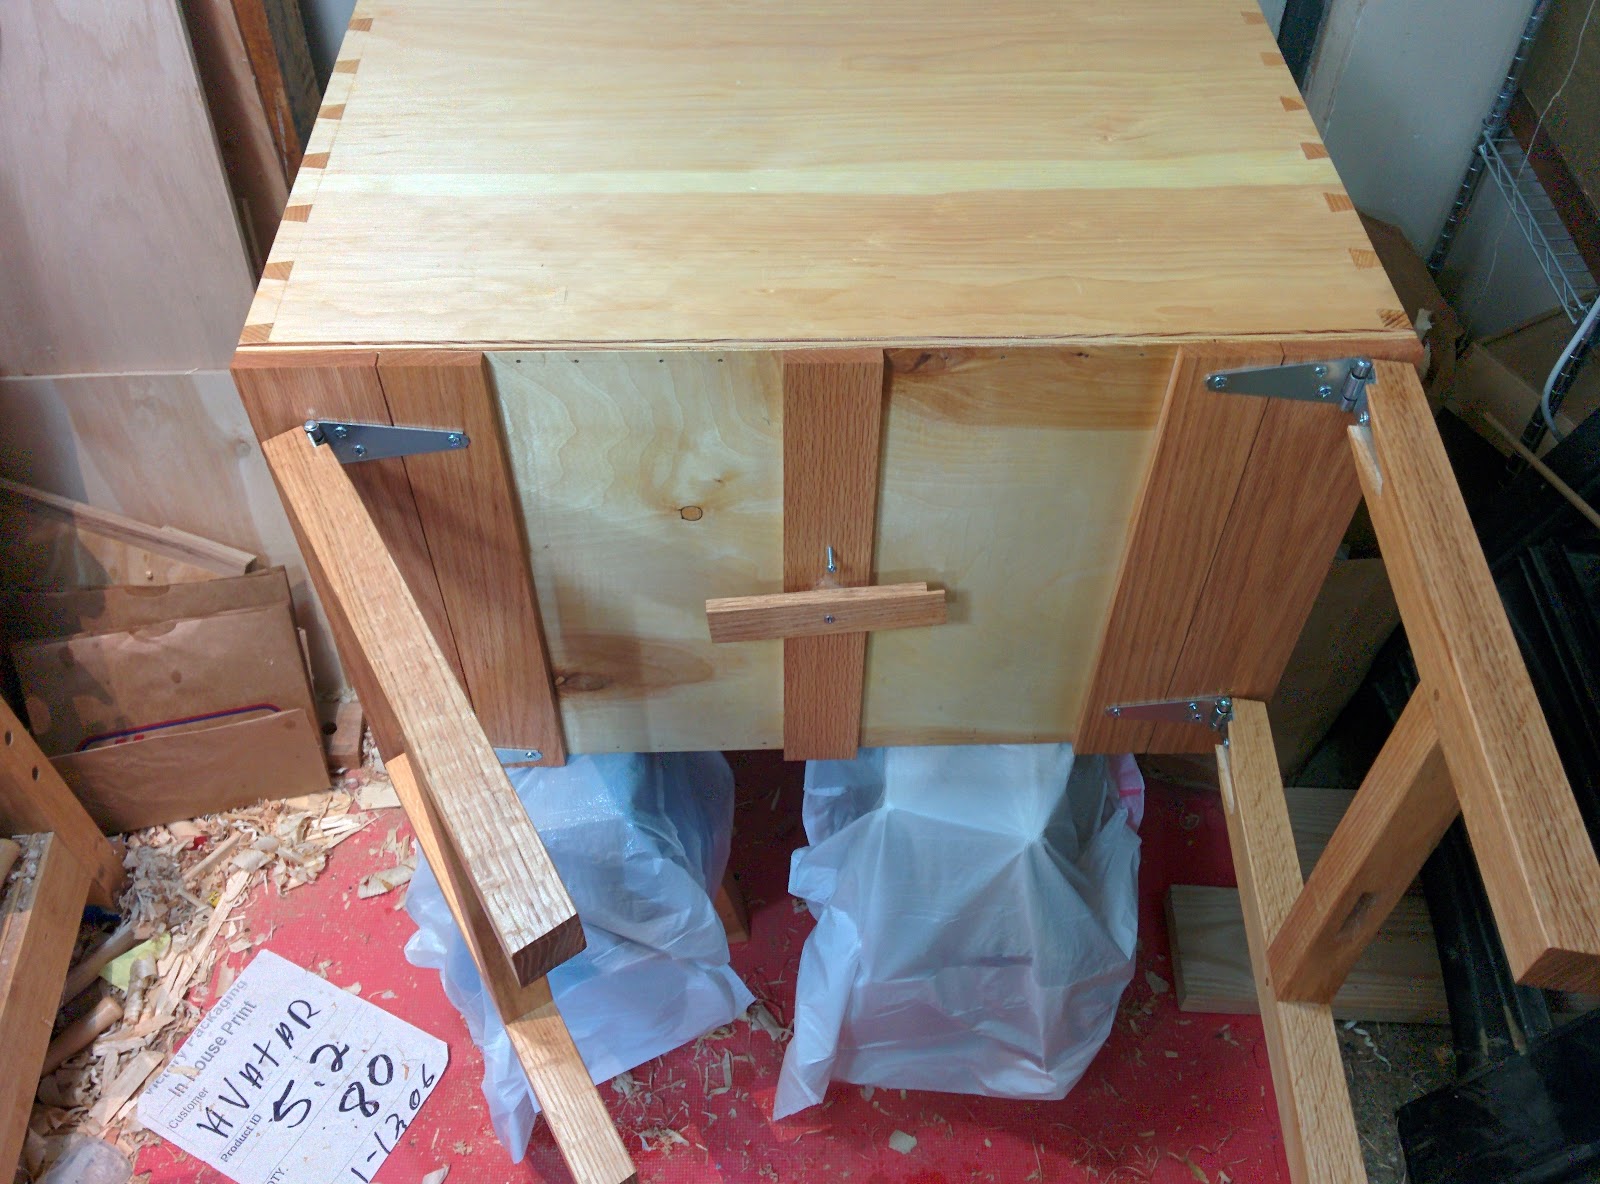
The only part of the project you could call "joinery". Fun to slap together, though.
We made a couple notches for cross-pieces across the top, which stiffen the frame and support the segmented lid. If I recall correctly, it only took a couple of hours to put it together. The sanding and painting took longer. I'm posting this at this time of year because I think something similar could make a good last minute gift for someone. Maybe a little kid, or maybe a parent with a mess on their hands.

If you build this, have some rope on hand.

P.S. A note on safety: Plywood chest lids can be a danger to small fingers and heads.If you build this project, you may want to look into hinges designed for this problem, or be extra watchful
 
This is a happy kid. Now He's a considerably larger happy kid. I really ought to have posted this a long time ago. 

Thursday, December 4, 2014

WIP

I haven't been posting here a lot lately, and I would like to talk about the other things I've been spending time on.

I have been working wood, but more to the point, I have been attempting to reduce work-in-progress. In other words, finishing what I start.

WIP storage in the woodshop. Right next to the lumber rack so I am reminded to finish some WIP instead of starting in on a fresh board. Apparently I have a knack for almost finishing paddles.

Managing a software kanban system at my job had made me very aware of the inefficiency that inevitably comes with doing too many things at once. I started to notice projects that I had left halfway done, both in the wood shop and out. After a while I decided to track my WIP (work-in-progress). I already use an electronic GTD process to manage tasks, so it wasn't much of a stretch to tag the tasks in progress, list additional WIP as I noticed it, and keep a count so I know how I am doing.

Within a couple of weeks of keeping track, I could see 50 WIP items, all things I've started and not finished. Since then, I've spent a few months finishing projects and resisting the urge to start new ones. Now I have 73 because of all the additional WIP I've noticed along the way. (I peaked at 80). These tasks are all different sizes, by the way. Anything from borrowing a DVD to installing an attic floor and joists qualifies. I will often break up a task into sub-tasks, but only if each task has value on its own. For example, I am working on a tool chest, but each internal rack and tray, and the lid, etc. , ate tracked separately. I used my tool chest for months before I had even bought the wood for the lid frame, but it was still useful in that form. Building the lidless box was good for WIP too. I didn't have extra wood in my way while I used those folks to finish other projects. However, getting a single tray or box 50% done cannot be a separate task,  because getting to that point on its own doesn't accomplish anything. 

So, now I am trying to finish more things than I start (for a while). 73 is too many things to have hanging over my head. Anyway, this should explain the blog inactivity. Writing is another thing to do. My WIP numbers are actually starting to go down now, but I am not done by any stretch.

My immediate goal is to get that number under 10. After that I might worry about trying to post individually about every interesting woodworking project or idea I encounter. In the mean time, I'll post when time allows, and try to summarize a lot.'

Below are some pictures of woodworking projects and tasks that I've finished in the last few months. I'm not sure If I will make time to post about them individually. I hope they inspire you to start, or better yet finish, your own woodworking project.
functional saw till prototype that fits in my tool chest

Sliding trays for tool chest

Here are the trays and saw tills resting on the rails together

small maple spoon

candlesticks, an education in turning

Tool chest carcase and a lid that closes


Trays for keeping organized while moving stuff around the house. I learned to cut dovetails (by hand) with this project, and had some fun with wood dye.

Oak spoon, finished. I think I started this when I was a kid 20+ years ago. I noticed it, put it on the WIP list, and then it was a matter of time before I finished it. Not hard now that I own a spokeshave and a gouge.

Folding legs for tool chest. These now have casters that deploy when the legs are folded.

Temporary workbench with a thing that resembles a vise ("twin-holdfast-caul"?)

radially split oak log from my cousin's yard and stacked it to dry

extra-long maple cooking spoon. I should never have started this, but at least it was quick to finish.

Raised desk to standing height. To do this, I made a custom part for the IKEA stantions so they could go taller. 

Cocobolo handles for saw files. In hindsight, it would have been easier to use corn cobs, but this was fun.

Coat rack that actually fit in my house. I used this opportunity to teach some helpful friends to make fox-wedged mortise-and-tenon joints by hand. Those pegs are not coming out any time soon.

Friday, April 4, 2014

Splitting oak, day 2

Last night I showed up with another friend to help, and some additonal tools. We got it down to a science, finally. Warning, one of these photos is intentionally misleading.


Splitting something this thick is quite different that splitting firewood, I think mostly because it cannot deflect away from the wedge nearly as much.

Here's the recipe that worked for us:
1. score the line with a machete, lightly tapped with a dead-blow mallet
2. reinforce the line with several passes of axe & sledge, until about 2 inches deep
3. at 1/3rd and 2/3rds of the way across, bury the axe, pull out, and get a wedge started in its place before the wood swells and closes the gap. Use the wedges with powder coating right up to the edge so they grip instead of bouncing out.

4. Advance the wedges a couple inches, until the whole line starts to get visibly wider
5. add more wedges.
6. beat the wedges until the log is mostly split
7. lever with the froe down low to save a bunch of wedge work
8. reach in with a machete and snip a few fibers bridging the gap.
9. drink some beer.
We figured out that these eights weigh a little over 200 lbs. each.
YMMV, of course.
There was another more general lesson I got out of this too. It's a corrollary to that old one about the right tool for the job: It's not always obvious which tool is the most efficient. The best splitting wedges were the ones I bought at the last minute and I thought would be terrible. Certain whacking implements were useless at certain moments, and perfect at others. A few times, the log just laughed at us while bouncing a wedge out after we tried hitting it with steel. Other times it was a dead-blow mallet that induced wooden laughter. Having a couple to choose from was absolutely necessary.
Thanks to Seth for the rare opportunity, and to both him and Matt for the extensive help. And to Mikki for delicious food!


Thursday, April 3, 2014

Splitting oak, day 1

My cousin offered me this oak log from a tree-removal the other day. I got over there in a hurry and found this chunk at about 40" in diameter. It took me about an hour and a half to split it the first time, taking advantage of some checks that had already formed. I'm going back to expend more effort on it tonight.
I'm really looking forward to having radially split oak boards, but this is a learning experience I never bargained for. I broke my club/beetle, my froe, and severely degraded one hatchet handle in the process. leap-frogging a pair of splitting wedges is a nice theory, but I wish I had 10 sharp ones. (the 2 I used yesterday are sharp for today).
Enjoy the pictures.
The first step is scoring a line. I used a machete (not pictured).


This froe was still useful after it broke. I'm pretty sure breaking it was my own fault. I should not have hit it with steel after the wooden maul broke.
Finally it's in two. For bonus points, count the broken tools.
My cousin and I struggled with one half for a while. It was harder since there were no existing checks to take advantage of.

Wooden spoon, first attempt


This is my first [completed] attempt at a wooden spoon. It was more time consuming than I expected, but all in all, a pretty fun, easy project. And a nice way to make use of reaction wood. This one is from a forked maple branch.


Thursday, February 6, 2014

Coat & hat rack

 Here is a wall mounted rack for coats and hats that I made recently with help from some friends. The actual construction and joinery is only mildly interesting, but there are two things about this that are a bit unusual:
1.) The design itself is somewhat unique.
2.) Most of the joinery was mortise-and-tenon joints cut with hand-tools by people who don't even consider themselves woodworkers.

First, let's talk about the people.

A few of my friends and I get together regularly to have "work parties", where we help each-other with household projects, and learn new skills. In the past we've routed cat 5 cords, floored an attic, and done some light landscaping among other things. Recently I decided to get the group to slow down and produce something a bit more polished. I set up some semblance of a workbench on the kitchen island using two 2x? boards. I showed my friends how to chisel mortises, mark out the tenons and saw to a line. The joints had to be somewhat accurate, but not perfect, because they were to be wedged. I played the role of quality assurance, teacher, and found a few moments to cut some joints. As a group we did the joinery for 9 pegs, and only produced one tenon that was beyond repair. This was a lot of fun and proved that woodworking (with hand-tools, no less) is nothing to be intimidated about.
 
Now, onto the design, starting with requirements.
It all started with a shaker peg board I had been using for coats. You know the sort. One narrow board with a bunch of round pegs in a row. It's all to easy to pile too many coats on a peg. It's hard to get the coats to stay on, and when they do, they hide other coats and hats. Worst of all, the pegs fall out. You might say that their overloaded (and that's true), but the round tenons also contribute to the problem when they shrink to ovals and cause glue failure. I grew to loathe this simple peg-board and hatched an idea of a better replacement.


The new model would have to have:
* A way to hold coats so you can see them all at once.
* Pegs that won't fall out.
* A place for hats and scarves
* Plenty of room for 2 people's gear, and room for guest's coats
* A small footprint to fit the space (no more than 11" depth)

The solution was as follows:
I hang the coats on hangers, facing forwards. I mounted the pegs and hanger rods with fox-wedged mortise and tenon joints, forming a mechanical lock.
It's made of oak (for the pegs and border), ash & scraps of a random exotic (for the hanger-rods), and a combination of birch plywood and poplar for the main panel. Poplar strips behind the plywood allow for deeper mortises where needed.

All of the dimensions came directly from the use case. My wife and I planned it by mimicing the motions of hanging things on the wall, and marking the positions with tape. The shape of the pegs and hanger rods was also strictly form follows function, which is why the pegs look like little canoes that cradle the thing they are holding.

I'm not going to bore you with all the construction details and procedures. There are some dowels joints to hold the border on, and for the front lip of the hanger rods. I did a lot of the shaping with a stationary sander, but also used a spokeshave.
So far I really like using this coat rack. I have been able to take the coats of guest a couple of times, which fills me with satisfaction.
Is there a lesson here? Maybe:
* It's satisfying to re-think a design from the beginning, even for something as simple as a board with pegs.
* Woodworking is a pretty easy and fun thing to share with beginners, especially if you pick the right project. I'd recommend picking something that demands accuracy or polish, but not both at once.

Thanks to Amanda, Matt, Aaron, and Kevin for all your help!

Wednesday, February 5, 2014

File handles from a bare-bones lathe


These are a couple of file handles I turned from cocobolo scraps the other day. I needed some for a set of saw files and wanted something smaller than typical so they could fit in the tool roll. Also, if you have a lathe, it seems silly to buy something this simple. 

I have a lathe, but only barely. It's a grizzly "hobby lathe", and I wouldn't recommend it to most people. The tool rest isn't very solid and the drill holder required modification. It came with the wrong size wrench too. However, for a guy like me who doesn't have the space for a real lathe and a workbench in the same shop, this contraption that I can hang on the wall is pretty satisfactory.
I screwed the extruded aluminum base to a scrap of 2x10 which can be solidly clamped to my bench. There is an external speed control hooked up, but it has not yet proved necessary. My one and only lathe tool at the moment started as the tool-that-which-shall-not-be-named, but I ground the useless rasp teeth off and turned into a skew chisel that needs sharpening after two minutes of use.

Nevertheless, it worked fairly well and I am very satisfied with the result. I can see why people like turning. Nearly-instant gratification, and no joinery to mess up make for a fun experience.


   While I've got saw filing on the brain, I'll just mention that my first impression of the gramercy saw vise that just arrived is very positive. The only two previous occasions on which I've tried filing my own saws taught me that awkwardly clamping the saw to the end of the bench is the hardest part. Now I am expecting saw filing to be fairly quick and painless.

Thursday, January 30, 2014

simple ski rack

Here is a simple free-standing ski/snowboard/teleboard rack that I built over the weekend. I thought it would be worth sharing for inspiration.
Free-standing rack with teleboard, snowboard, and misc. gear.
The point of this rack is to store the equipment my wife and I use the most right near the door so it is convenient to hit the slopes frequently.
Since we don't have much space to spare for it, I made it light and used knock-down hardware. The idea is that it can be stowed in the attic for 8 months of the year and anytime we have a dinner party. I also tried to make it as small as possible.

Bolts & wing-nuts allow for easy dis-assembly.
Part of what made this rack fun to build was scaling it to the things it would hold. All of the dimensions came from the equipment. I also tried to allow for some flexibility. Extra pegs could be used to hang coats or for extra skis, but not at the same time. The pegs go straight through to the back so they can hold ski poles, drying mittens, etc.

I built this out of pine boards, poplar dowels, and one small plywood sheet--motivated by weight. To get it built fast (while it is still winter), I chose pre-surfaced lumber, then did simplified joinery using a carcass saw and a router plane. It was quick and easy to mark out the recesses by tracing around the mating board while holding it in place. The router plane in particular was the hero as it kept one setting for the whole project (board thickness), and made short work of the pine. Screws and glue provided strength while saving me the trouble of clamping.

Pegs vary in length and height for different skis/boards. You can see in this shot the small dowels that hold each one in place.
The bolts at the bottom allow this rack to break down into two pieces. Wingnuts are perfect here.
The dowels (pegs) are held in place with intersecting dowels. The smaller dowels were an easy way to ensure the pegs don't loosen and fall out.
Assembly was eased by having a Yankee screwdriver and cordless drill each set up to only do one job each.
To finish it, I orbital-sanded the whole thing once assembled, then wiped on 1 to 2 coats of thinned polyurethane.

That's it! I hope this inspires you to simplify a project.